Setting up Adobe Illustrator for Laser Cutting
Setting the correct Units
The first thing to set up in Adobe Illustrator is the measurement units and workspace.
We will set the document units to millimetres (mm). This makes it easier to create artwork at the correct physical size for laser cutting. Later, we will make sure the workspace is set up so the key tools and panels needed for laser cutting are easy to access.
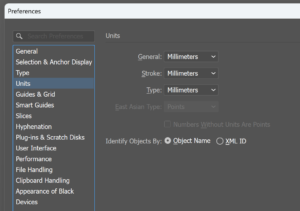
- From the Edit menu select Preferences → Units
- Select the following options from the drop down menus:
General = Millimetres
Stroke = Millimetres
Type = Millimetres
We change this so that the document units are easy to understand. If the document is presented using points or inches, measurements will be confusing even if the artwork is correctly scaled.
Choosing a useful Workspace
The next step is to select the Printing and Proofing workspace. This opens many of the key tools and panels that are useful when preparing artwork for laser cutting.
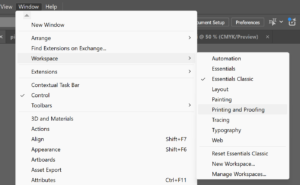
Select Window → Workspace → Printing and Proofing
This workspace provides easy access to useful panels including:
- Properties
- Layers
- Align
- Transform
- Stroke
- Colour
Having these tools available will make it easier to check the artwork, dimensions, line settings, and positioning before sending the file to the laser cutter.