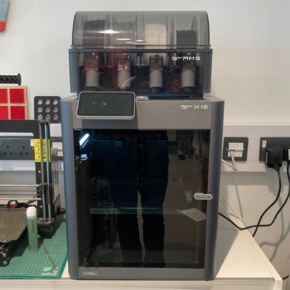
Bambu Lab X1E
| This placeholder article needs more information adding to it. More details are coming soon, if you can please ask the technical staff for a wiki account and help out. |
 | |
| FDM process 3D printer with automatic material changer. | |
| Equipment Information | |
|---|---|
| Status | Unknown |
| Manufacturer | Bambu Lab |
| Model | X1E |
| Working Area | 256 mm × 256 mm × 256 mm |
| Maker Space Information | |
| Training Required | Yes |
| Training Information | Here |
This exceptionally fast 3D printer has an automatic material changer and can be programmed using the micro-SD card slot on the front. We have the X1E variant due to the built-in ethernet port, which we plan on utilising soon.
This machine doesn't use Cura - instead you should slice files for printing using Bambu Studio. This is available on all the Maker Space PCs.
Training
We recommend using this printer once you are familiar and comfortable using the Ultimaker printers. Follow the 3D Printing Quick Start Guide to get started with those, and ask a member of staff if you would like to be shown how to use Bambu Studio.
Usage
Build plates
There are a variety of build plates available, but the most commonly used combination is loaded into the printer most of the time. Use the Cool Plate side for printing with PLA, and the Engineering Plate side for printing with materials like PA-CF, ABS etc.
The printer detects which build plate is loaded and compares it to the build plate it is expecting in the sliced g-code file. If it starts complaining, check you've got it the right way around! Also check that you have select the correct build plate when slicing your parts in Bambu Studio.
The build plate is held to the bed magnetically. To remove it simply pull up, to replace use the guides in the back and slide the plate in at a slight angle until it is seated in the correct position.
Loading files
There is a micro-SD card located on the right of the control touch screen. Push it gently to pop it out.
Insert this micro-SD into the card reader on one of the Maker Space PC, then save your print file to it from Bambu Studio.
Starting a print
- Insert the micro-SD card into the side of the touch panel control. It will only fit in one orientation, so don't force it.
- Select the "folder" icon on the left hand side.
- Choose the Micro-SD Card tab.
- Select your file from the list by tapping on it.
- You can change the filament you are printing with from this screen if needed.
- Select Print Now.
Removing prints
Wait for the printer to cool, then carefully remove the build plate from the machine. Gently flex the build plate to pop the parts off.
Clean up any extruded material, including the calibration lines.
Don't use a metal scraper, use one of the printed mini scrapers.
Filament
This printer uses 1.75mm filament.
Unfortunately the Filamentive cardboard filament spool doesn't fit into the AMS properly (the lid can't close) so we use the Bambu Lab filament ordered through Additive-X. Refill packs are recommended to reduce the amount of plastic waste produced.
