Nikon Altera 10108: Difference between revisions
No edit summary |
No edit summary |
||
| Line 3: | Line 3: | ||
A Coordinate Measuring Machine, or CMM, is a powerful automated way to precisely measure physical objects. Common in a machine shop environment they can be used as a way to quickly and repeatedly measure machined parts to ensure they are within tolerance. | A Coordinate Measuring Machine, or CMM, is a powerful automated way to precisely measure physical objects. Common in a machine shop environment they can be used as a way to quickly and repeatedly measure machined parts to ensure they are within tolerance. | ||
Our machine can also be | Our machine can also be fitted with a laser scanning head so that delicate and more "organic" surfaces can be measured accurately. | ||
== Training == | |||
This machine is very involved, but we are more than willing to show you how it works. You will need - | |||
* A machined part you wish to measure | |||
* A STEP file of the part to reference against | |||
* A technical drawing with the dimensions you wish to inspect clearly shown. | |||
If you have these, book training on this machine please complete the [https://forms.office.com/Pages/ResponsePage.aspx?id=QCm1Zbb0vUGDPTAz7Lz24dQpHvOmCP1NlW433yS4JNxUM0M5RklKT0U0REpSMEZWSjVURlUwME5EUCQlQCN0PWcu training request form]. | |||
== Power Up & Power Down == | == Power Up & Power Down == | ||
Latest revision as of 15:58, 8 January 2024
A Coordinate Measuring Machine, or CMM, is a powerful automated way to precisely measure physical objects. Common in a machine shop environment they can be used as a way to quickly and repeatedly measure machined parts to ensure they are within tolerance.
Our machine can also be fitted with a laser scanning head so that delicate and more "organic" surfaces can be measured accurately.
Training
This machine is very involved, but we are more than willing to show you how it works. You will need -
- A machined part you wish to measure
- A STEP file of the part to reference against
- A technical drawing with the dimensions you wish to inspect clearly shown.
If you have these, book training on this machine please complete the training request form.
Power Up & Power Down
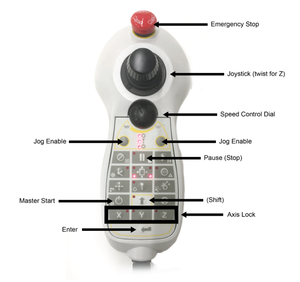
Joystick Control Pad

The joystick and control pad is used to move the head around the working area and control other functions on the machine.
Moving the probe head
These instructions assume you are at the front of the machine.
- Pushing the joystick to the left and right will move the probe accordingly.
- Pushing it forward will move the head towards the back of the machine and pulling it towards you will move the head to the front of the machine.
- Twisting the joystick anticlockwise will move the head up
- Twisting the joystick clockwise will move the head down.
If you are trying to move the head and the controller is beeping at you and refusing to move you need to enable jog mode. Press either of the Jog Enable buttons.
Restricting axis movement
There are circumstances where the machine must move only in one axis. This is possible by using the Axis Lock buttons.
Motion is prevented in the relevant axis when the light is illuminated.
Automatic Movement Speed Control
The speed the machine moves automatically can be controlled using the Speed Control Dial. When the dial is turned fully anticlockwise the machine will not move automatically - it is essentially in "feed hold". When turned fully clockwise the machine will move as fast as it can.
When starting a job turn the Speed Control Dial all the way anti-clockwise, increasing the speed slowly until you are happy the job is running properly. Run a job the first time through at half speed, maximum, to reduce the likelihood of a programming error causing damage.
CMM Manager
We use CMM Manager to operate our machine. It can import a variety of CAD files for automatic inspection but overall it is not straightforward software to use. We are currently recording videos demonstrating the basic use of the software, but an amount of self-directed learning and experimentation is required.
Demo Parts
To help illustrate the function of the CMM there are several demostration parts available with pre-programmed inspection cycles.

