Quick Start Guide - 3D Printing: Difference between revisions
No edit summary |
m (→1 - Get a File) |
||
| Line 20: | Line 20: | ||
If you find the list of files daunting, try taking a look at sides like All3DP which sometimes have run-downs of the high-quality models available. | If you find the list of files daunting, try taking a look at sides like All3DP which sometimes have run-downs of the high-quality models available. | ||
* [https://all3dp.com/topic/useful-3d-prints/ Useful 3D prints] | * [https://all3dp.com/topic/useful-3d-prints/ All3DP - Useful 3D prints] | ||
Once you have your STL file, save it somewhere you will be able to access from the Maker Space computers. This could be on the F drive, or on a USB disk. | Once you have your STL file, save it somewhere you will be able to access from the Maker Space computers. This could be on the F drive, or on a USB disk. | ||
| Line 52: | Line 52: | ||
Watch this video to get an overview of how to use the Cura slicing software. The steps are broadly applicable for both the Ultimker 2+ and the Ultimaker S5 printers. | Watch this video to get an overview of how to use the Cura slicing software. The steps are broadly applicable for both the Ultimker 2+ and the Ultimaker S5 printers. | ||
* [https://www.youtube.com/watch?v=wxENspG9tMQ How to Use the Ultimaker S5 3D Printer: Preparing your File] | * [https://www.youtube.com/watch?v=wxENspG9tMQ YouTube - How to Use the Ultimaker S5 3D Printer: Preparing your File] | ||
=== Things To Consider === | === Things To Consider === | ||
| Line 59: | Line 59: | ||
The printer can't reliably print in mid-air. The molten plastic will droop and sag, and potentially cause a failed print. The solution to this problem is to use sacrificial support material that can be removed later on. Angles up to 60 degrees or so can be "self supporting" so a slight model change may give you a better solution. | The printer can't reliably print in mid-air. The molten plastic will droop and sag, and potentially cause a failed print. The solution to this problem is to use sacrificial support material that can be removed later on. Angles up to 60 degrees or so can be "self supporting" so a slight model change may give you a better solution. | ||
* [https://all3dp.com/2/3d-printing-supports-guide-all-you-need-to-know/ 3D Printing Supports - 3 Simple Steps to Success] | * [https://all3dp.com/2/3d-printing-supports-guide-all-you-need-to-know/ All3DP - 3D Printing Supports - 3 Simple Steps to Success] | ||
Sometimes eliminateing supports isn't an option, but you should at least try to make things easy for yourself. | Sometimes eliminateing supports isn't an option, but you should at least try to make things easy for yourself. | ||
| Line 80: | Line 80: | ||
The "adhesion" checkbox will add a brim of material to your parts. This may help reduce warping, or provide additional stability when printing tall, slender structures. | The "adhesion" checkbox will add a brim of material to your parts. This may help reduce warping, or provide additional stability when printing tall, slender structures. | ||
* [https://all3dp.com/2/3d-printing-brim-when-should-you-use-it/ 3D Printing Brim: When should you use it?] | * [https://all3dp.com/2/3d-printing-brim-when-should-you-use-it/ All3DP - 3D Printing Brim: When should you use it?] | ||
==== Material Usage ==== | |||
We don't charge for the fair use of 3D printing materials, but there are practical considerations. A full reel of material is 750g, so using more than that will cause the printer to either run out and fail (Ultimaker 2+ printers) or stop and wait (Ultimaker S5 printers, most of the time...) | We don't charge for the fair use of 3D printing materials, but there are practical considerations. A full reel of material is 750g, so using more than that will cause the printer to either run out and fail (Ultimaker 2+ printers) or stop and wait (Ultimaker S5 printers, most of the time...) | ||
Revision as of 11:26, 4 January 2024
On the surface 3D printing is a pretty straightforward process - it's exceptionally easy to go from a 3D model file to a physical model. There are some pitfalls you should be aware of when designing for additive manufacturing though, such as overhangs, support structures, and file resolution.
FDM/FFF - or "computer controlled hot glue gun" - printing is the easiest to get started with, so we'll begin with one of the Ultimaker printers.
1 - Get a File
You need an STL or an OBJ file. These can be exported from your 3D modelling software of choice, such as Autodesk Fusion 360, Solidworks, Blender, etc.
- Exporting STL files from Fusion 360
- Exporting STL files from Solidworks
- Exporting STL files from TinkerCAD
Using Sketchup to design models for 3D printing is explicitly not recommended.
If you don't have a particular design you want to print but want to learn the process, take a look at some of the design aggregator sites to find something that takes your interest. It's recommended you start with something simple and straightforward - don't print a 100-piece clockwork mechanism or a tiny, highly detailed figurine your first time around!
If you find the list of files daunting, try taking a look at sides like All3DP which sometimes have run-downs of the high-quality models available.
Once you have your STL file, save it somewhere you will be able to access from the Maker Space computers. This could be on the F drive, or on a USB disk.
2 - Choose a Printer
Come to the Maker Space and head straight in to the Print Hive. You're looking for a printer that's ready and waiting to be used, or has finished printing and can be made ready for use.
Don't stop, abort, or otherwise cancel a print that is already running unless there is an obvious error with the print (such as spaghetti!)
Don't remove the SD card or USB drive from a printer in the middle of a print - it will cause the print to abort.
If you've found a printer you simply need to remove the storage.
- Ultimaker 2 and 2+ Extended printers - press on the SD card to the left of the display screen. It will pop out.
- Ultimaker S5 printers - Take out the USB drive from the front.
Take the storage back to a PC in the CAD suite.
3 - Prepare For Printing

The 3D printers can't do anything with the 3D model you have downloaded or exported - unfortunately it's not a case of just copying the STL file onto the SD card and hitting the print button. Instead, we need to slice the 3D model into a series of layers.
This slicing is done by specialist software. We use Ultimaker Cura, a free and open-source slicer maintained by the manufacturer of our printers. Because it's free you can download and install it onto your own PC or laptop and prepare your files from the comfort of your own home.
- Open Ultimaker Cura on the PC, you can find this in the Start menu. It sometimes takes a few minutes to open so don't worry if nothing happens immediately.
- When the software starts agree to the licence conditions. You don't need to create an Ultimaker account, so don't bother signing up.
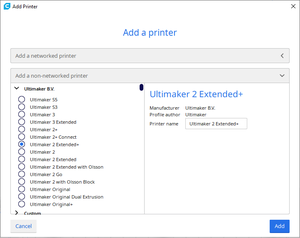
- Select "Add a non networked printer" from the window and select the appropriate option from the list.
4 - Position Your Files

Watch this video to get an overview of how to use the Cura slicing software. The steps are broadly applicable for both the Ultimker 2+ and the Ultimaker S5 printers.
Things To Consider
Support structures & overhangs
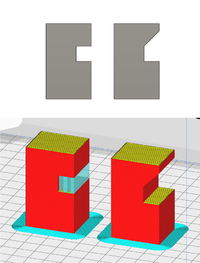
The printer can't reliably print in mid-air. The molten plastic will droop and sag, and potentially cause a failed print. The solution to this problem is to use sacrificial support material that can be removed later on. Angles up to 60 degrees or so can be "self supporting" so a slight model change may give you a better solution.
Sometimes eliminateing supports isn't an option, but you should at least try to make things easy for yourself.
To turn on supports, check the "Support" box in the print profile box in the top right had dropdown.

Print orientation matters
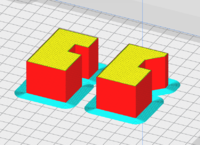
The support structure illustration brings us to the next point. Can we orient the print in a manner that makes it easier to print? By lying the print on it's back the need for supports is removed entirely.
Typically, you want featureless flat surfaces to be facing the build plate. Play around with the rotate tool (in particular the "align face to build plate" utility) and see if you can arrange your files in a way that will provide the best support to your designs.
Infill Percentage
The amount of infill is the simplest way to affect the strength of your parts. More infill, typically, means a stronger part. It also leads to more material use and more time taking to print. The defaults of 18-25% are fine for most use cases, and it's unusual that you would go above 50%.
Layer Height
The profiles that use 0.15 mm layer height are great starting point. A finer layer height (or thickness) affects how fine a vertical resolution your parts have but will increase print time drastically. A coarser layer height will print faster but prints may look rougher.
Build Plate Adhesion
The "adhesion" checkbox will add a brim of material to your parts. This may help reduce warping, or provide additional stability when printing tall, slender structures.
Material Usage
We don't charge for the fair use of 3D printing materials, but there are practical considerations. A full reel of material is 750g, so using more than that will cause the printer to either run out and fail (Ultimaker 2+ printers) or stop and wait (Ultimaker S5 printers, most of the time...)
You can find how much material you will be using by checking the bottom right of the screen once you have clicked the Slice button.
5 - Slicing Your Files
Happy with how your files are laid out? Now's time to slice them and save them onto the SD card or USB drive that you took from the printer.
- Click the Slice button in the bottom right of the Cura window, then take a look at what has been produced by clicking Preview.
- If everything looks good you can save your sliced file straight onto the storage media by clicking Save to removable drive in the bottom right.
If you have another USB drive inserted into the PC, remove it before clicking "Save to removable drive". Cura might save to that disk instead of the one from the 3D printer!
- Eject the disk when prompted, and remove the storage media from your PC.
6 - Log the Print Job
We don't charge for materials, and there are very few restrictions on what you can print. We do like to know where are material is going though, and we like to keep track of interesting projects coming through the Maker Space. This information helps us secure funding each year.
In return for the free use of our machines and materials we ask that you fill in the 3D print log when you start a print.
This form is also available as a link from the desktop of the Maker Space PCs in the "Work Logging" folder. All of the information you require is in Cura, and we are typically printing with PLA.
7 - Starting the print
Now you have your sliced files on the SD card or USB drive it's time to start a print running. Take your storage media back to the printer you took it from and insert it again.
- Check that there is enough material to print your design. A full reel is 750g, so you can estimate the amount left. Ask a member of technical staff if you are not certain.
- Check the build plate is clean and clear. There should be no remnants of the previous print left on the bed. If there are, gently use one of the flat scrapers to remove debris from the glass build plate.
For Ultimaker 2+ Printers
Using the scroll wheel interface select Print. Scroll through the list of files until you find yours. The file name is shown in the bottom left of the Cura window, and is usually the last one on the list. Try scrolling anti-clockwise to get to the end of the list faster.
For Ultimaker S5 Printers
Using the touch screen select your file, it is usually the top of the list. It will show you a small preview image to help ensure you select the correct one.
