Tailstock (Haas ST-15Y): Difference between revisions
(Created page with "In order to support long material the lathe has a hybrid hydraulic-manual tailstock. This tailstock can hold tools with an MT3 taper, such as a live centre. Always remove tools from the tailstock to reduce the risk of collisions with the tool turret. == Inserting tools into the tailstock taper == It is crucially important that the taper of the tool and the taper in the ram of the tailstock is impeccably clean. An...") |
(No difference)
|
Revision as of 17:56, 15 December 2023
In order to support long material the lathe has a hybrid hydraulic-manual tailstock. This tailstock can hold tools with an MT3 taper, such as a live centre.
Always remove tools from the tailstock to reduce the risk of collisions with the tool turret.
Inserting tools into the tailstock taper
It is crucially important that the taper of the tool and the taper in the ram of the tailstock is impeccably clean. Any dirt, dried oil, or similar will cause the tool to become jammed in the tailstock.
- Clean the taper on the tool, and in the tailstock ram, with a paper towel and WD-40.
- Slide the tool into the taper, and press it firmly home into the taper.
- There is no need to slam the tool into the taper, but tools must be seated securely so they do not spin and score the taper.
Removing tools from the tailstock taper
- Ensure the tailstock is securely clamped to the ways.
- Place soft material in the bottom of the lathe to catch the tool when it is ejected. You can use the foam mesh material for this.
- Insert the aluminium drift into the hole in the back of the tailstock ram. Do not use a steel bar - only use the aluminium one.
- Hit the end of the bar with a mallet firmly to release the taper lock. The tool should come free.
- If the tool does not come free after a few attempts at removal ask a member of technical staff for help.
Actuating the tailstock
Foot switch
The primary method of moving the hydraulic ram of the tailstock is the foot switch marked with the tailstock icon. Pressing the tailstock foot switch will toggle the ram position between the "engaged" position (towards the chuck) and the "rest" position (away from the chuck.)
Current Commands screen
Press the Current Commands button then navigate to the Tailstock item. Press the F2 key to toggle the ram position.
G-Code
You can use M codes M21 and M22 in your program to automatically actuate the tailstock ram. These codes will also work in the MDI mode of the Haas control.
M21 will engage the tail stock, M22 will retract the tailstock.
Adjusting the tailstock position
A large black bolt head on the top of the tailstock clamps the tailstock in position. It must be loosened before it can be moved along the ways.
- Move the tool turret to the home position so there is enough space to work safely.
- Clean the tailstock ways in the bottom of the lathe. Make sure they are free of chips and dirt, and lubricate them with a light coating of oil.
- Using the black rubberised tailstock spanner loosen the locking nut until it is visibly loose.
- Slide the tailstock into the new desired position.
- Tighten the locking nut until the tailstock is securely clamped in place.
Adjusting the tailstock pressure

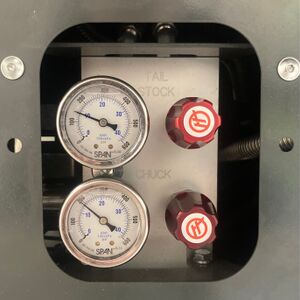
The hydraulic pressure regulator for the tailstock can be adjusted on the panel at the bottom left of the machine, as you look at the front.
Turning the red knob in the upper half of the regulator panel will adjust the amount of pressure exerted by the tailstock. Clockwise will result in more pressure, turn the knob anti-clockwise for less pressure.
Be careful when setting this value - too high can bend parts, too low can result in sub-optimal clamping. You may wish to use a dial indicator to assess the amount of deflection you are causing.
If the gauges read zero the machine is either asleep or in an alarm state. Press the Reset button to wake the machine up or clear the error.
