Threading (Haas ST-15Y): Difference between revisions
No edit summary |
mNo edit summary |
||
| Line 158: | Line 158: | ||
* [https://www.fastenerblackbook.com/ Fastener Black Book - Pat Rapp] | * [https://www.fastenerblackbook.com/ Fastener Black Book - Pat Rapp] | ||
[[Category:Lathe]] | |||
[[Category:Fusion 360]] | |||
Latest revision as of 16:28, 15 December 2023
OD Threads with a partial-form threading insert
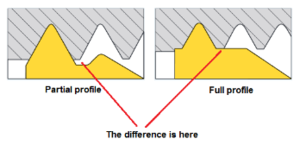
A partial form threading insert has a sharp point to it - much sharper than the radiused base of a full-form threading insert. Because of this extra care must be taken to ensure the thread is cut to proper depth. For a longer production run of parts where the thread form has to be perfect it is recommended that you use a full profile threading insert.
If you are trying to cut a thread and it just seems like it isn't cutting deep enough it is likely this is at least part of the problem. Ask a member of staff to talk you through how to adjust the wear offsets properly.

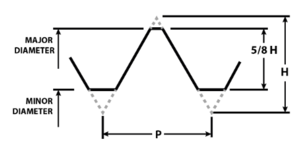
As a starting point, refer to the table below (based on Page 111 of the Fastener Black Book) and subtract 5/8 H from the full height value H. This value should be entered into the X diameter wear column of the lathe offset page for the threading tool, as a negative value. Type the value into the control and press F1 to overwrite the current value.
Be sure that you are not going to take too deep of a cut on the first pass, this is especially true when cutting larger pitches. An especially deep first cut may damage the insert or the workpiece.
This table covers 60 degree metric/ISO threads only. For Imperial/UNC/UNF threads not shown here refer to the Fastener Black Book (Pat Rapp Enterprises, 2007), pages 68 and 69.
Metric 60 degree threads
| Pitch | H | 5/8 H | Tool Table Offset |
| 0.2 | 0.173205 | 0.108253 | -0.065 |
| 0.25 | 0.216506 | 0.135316 | -0.081 |
| 0.3 | 0.259808 | 0.16238 | -0.097 |
| 0.25 | 0.216506 | 0.135316 | -0.081 |
| 0.4 | 0.34641 | 0.216506 | -0.130 |
| 0.45 | 0.389711 | 0.24357 | -0.146 |
| 0.5 | 0.433013 | 0.270633 | -0.162 |
| 0.6 | 0.519615 | 0.324759 | -0.195 |
| 0.7 | 0.606218 | 0.378886 | -0.227 |
| 0.75 | 0.649519 | 0.405949 | -0.244 |
| 0.8 | 0.69282 | 0.433013 | -0.260 |
| 1 | 0.866025 | 0.541266 | -0.325 |
| 1.25 | 1.082531 | 0.676582 | -0.406 |
| 1.5 | 1.299038 | 0.811898 | -0.487 |
| 1.75 | 1.515544 | 0.947215 | -0.568 |
| 2 | 1.73205 | 1.082531 | -0.650 |
| 2.5 | 2.165063 | 1.353164 | -0.812 |
| 3 | 2.598075 | 1.623797 | -0.974 |
| 3.5 | 3.031088 | 1.89443 | -1.137 |
| 4 | 3.4641 | 2.165063 | -1.299 |
| 4.5 | 3.897113 | 2.435695 | -1.461 |
| 5 | 4.330125 | 2.706328 | -1.624 |
| 5.5 | 4.763138 | 2.976961 | -1.786 |
| 6 | 5.19615 | 3.247594 | -1.949 |
OD Threads with a full-form insert

Full form inserts cut both the root and the crest of the thread and provide geometrically accurate thread forms. They are limited to a specific pitch though, so they are more restricted in their general purpose usefulness.
These thread depths are known good starting points for cutting threads with the appropriate full-depth threading tool in Fusion 360, and have been verified with either thread wires or a dedicated thread gauge.
| Thread Size | ID/OD | F360 Thread Depth | Verification Method |
| M22x1 | OD | 0.58 mm | Go/No Go Ring gauges |
